Monday, May 26, 2014

Old Fashion Dill Pickles

Cucumbers are growing in our garden and it is time to make some pickles.  This year I am making pickles the old fashion way, using a brine and no vinegar.


First I collected my fresh cucumbers, dill, and grape leaves from our garden.
 
Then I mixed one gallon of warm water with 3/8 cup of pickling salt.  It is important to use pickling salt for two reasons.  First and most important it does not contain iodine, and second the salt is very fine and mixes well with the warm water.

Next I washed my jars and gathered the rest of my supplies and ingredients.

Here is a list of ingredients and supplies you will need

Fresh Cucumbers
Fresh dill
Fresh grape leaves
Gallon of water mixed with 3/8 cup pickling salt (this is the brine)
For a gallon jar I used the following:
        4 cloves of garlic -peeled and smashed
        1 tablespoon of whole peppercorns
        3 bay leaves
        2 tablespoons of dried dill weed

Large glass jar (wide mouth jars work best)
1 Ziploc bag quart size
a container big enough for the jar to sit in

In the bottom of my glass jar I put in grape leaves, the garlic cloves, peppercorns, bay leaves, and the dried dill weed.

Next I placed the fresh dill and cucumbers in the jar.  Making sure the water was cool I added the brine to the jar until it covered the cucumber.  Next I set the jar in a bowl and placed a Ziploc bag filled with the brine water on top to hold down the cucumbers.  Fill the Ziploc bag with the brine in case the bag leaks.

As the cucumbers ferment the brine will over flow from the jar so it is important to put the jar in a container to catch the overflow.


Fermentation will take several days to begin.  The brine will start to bubble and this will be the sign that fermentation has started. After a week of fermination you can start tasting the pickles and when they have the perfect taste for you then place the lid on the jar and place in the fridge.  Pickles will last six months or longer in the fridge.  Of course I do no think they will last that long at my house.  We all love dill pickles.

Friday, May 16, 2014

Eggs


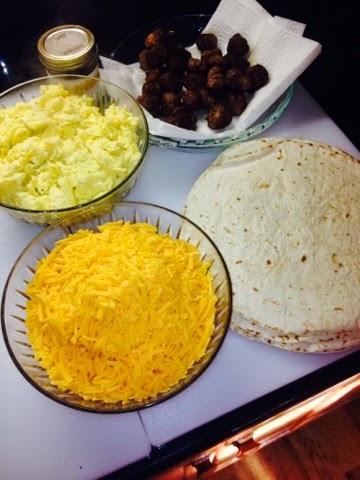
I have two reasons for making my breakfast burritos and freezing them.  Right now the chickens are laying  eggs like crazy and it seems the trays of eggs are taking over my fridge.  This comes at a good time because in several weeks the kiddos will be out of school for the summer and they eat egg burritos for breakfast and lunch. All they have to do is take a burrito out of the freezer and pop into the microwave. 
 
First I prepare all my ingredients for the burritos. I  scramble the eggs, cook the sausage and grate the cheese. 
 
 
  Next I add the ingredients to the tortilla and wrap the filled tortilla in plastic wrap and place in the freezer.  After the kids take the burrito out of the freezer and microwave they can add salsa and top with extra cheese.  
 
This is a great way to use up all those extra chicken eggs and save time in the mornings too. 
 

Tuesday, May 13, 2014

Tator Diggin Day

Today we dug our last four rows of potatoes.  This year has been a great year for potatoes and I have cooked many in the last few weeks,  We have had mashed potatoes, potato salad, fried potatoes, home fries, and baked potatoes.  There is nothing tastier than a fresh dug potato.  To preserve some of this flavor and bounty I am canning what we dig today.  This is what we have learned from my mom and sister on canning potatoes

First thing is to use the sprayer attached to the water hose to remove the skins.  After R dug all of the potatoes he used the pressure washer to peel them. 

 
Since the skins are very tender when they are first removed from the dirt the skins come off very easily.  As soon as the potatoes are peeled we put them in a pan of water with a small amount of lemon juice to prevent the potatoes from turning brown while we are working.


Next we cut the potatoes into cubes and packed them in a sterilized quart jar with a teaspoon of canning salt and hot water.  After leaving one inch of air space at the top of the jar, making sure there were no air pockets in the jar, and placing the seal and ring on each jar, we placed them in the pressure canner.  In the canner we had put about 3 inches of hot water.

 
Once the pressure started to build and the steam was coming out of the vent we waited for ten minutes before putting the weight on the canner to build the pressure.  Then we let the pressure build to ten pounds (the pressure recommended for our area)  and set the timer for 40 minutes.  It is very important that the pressure stays at ten pounds for the entire 40 minutes.
 
After the time was up and the pressure had returned to zero we opened the canner and removed the jars.  The jars need to sit overnight and cool before storing the potatoes. 


Today we canned 35 quarts of potatoes.  With these canned potatoes we can make potato salad, boiled potatoes with butter, mashed potatoes, they can be sauteed with onions and peppers, and used in soups and stews.  Not only are canned potatoes convenient but they are delicious too.

Monday, May 5, 2014

Garden Fresh Spaghetti Sauce

With 23 pounds of tomatoes, several large sweet peppers, and onions from our garden I decided to make and can homemade spaghetti sauce. 


The top and middle tray of tomatoes are early girl, plum, and grape tomatoes.  The large bottom pan is filled with black krim tomatoes. Peppers are cubanelle peppers and California wonder bell peppers. Both peppers are sweet and have a great mild pepper flavor.
Here is how I made my sauce
After I washed and took the stems out of the tomatoes I put them in my food processor
Next I put the tomato juice in the food press to remove any skin and seeds
I put the peppers (stemmed and seeded) in the food processor with the onions and chopped
In a very large stock pot I added the tomato juice, chopped onions and peppers
Then I added the following
(3) 6 oz cans tomato paste
2 tablespoons each of the following dried herbs and spices
basil
parsley
garlic powder
crushed red pepper flakes
oregano
2 single bay leaves
 
Next I added
1 cup olive oil
1/4 salt
1 cup sugar ( less sugar if you like a tangy sauce or more if you like a sweeter sauce) The sugar is really determined by the type of tomatoes used. Black Krim tomatoes are very acidic and tangy tasty where as the early girls have a milder taste.
 
After the mixture came to a boil I reduced the heat to a simmer and cooked for about 4 hours. The amount of time the sauce cooks is determined by how thick you want the sauce to be. I like my sauce to be a medium to thick sauce. 
 
After saucing my tomatoes, chopping my peppers and onions, adding spices, and letting the sauce simmer for a while I decided to make spaghetti for lunch.  This was the taste test to see if the sauce needed more seasoning. I made a simple Bolognese Sauce just by adding browned ground beef to the sauce.
 
Once the sauce passed the taste test and it simmered for 4 hours it was time to can the sauce.  In sterilized quart jars I added the sauce and put the jars in a water bath for 40 minutes. 


Now on a busy night, dinner will be as simple as cooking noodles and opening a jar.  With the addition of a fresh salad and some bread I will have a great home cooked meal in just minutes. Love that!!! 

Wednesday, April 30, 2014

Florida Zucchini, Georgia Pecans, & Kentucky Bourbon Cake


With zucchini taking over my life I decided to make a bundt cake using the zukes and it just got crazy from there.  The inspiration for this cake came from a rum cake recipe that used zucchini.  I thought why not use that bourbon we bought last month when we went on vacation to Kentucky.  Make it a zucchini bourbon cake. 

Kentucky is a beautiful state and the Kentucky Bourbon Trail took us to many rural parts of the state.  Even though we are not bourbon drinkers, the history of the distilleries and the beauty of the farmland was worth the trip.  We purchased a small bottle of bourbon at one of the distilleries as a souvenir. I decided this bourbon would be perfect for my cake.

Another addition to this cake was a cup of pecans.  During the fall my aunt picked up pecans from the trees in her yard, had them cracked, and my mom cleaned and bagged them for the freezer.  Of course they shared them generously with me.  Georgia pecans seemed to be the perfect nut for this cake.

Combining ingredients from these three southern states made a totally delicious southern cake. I do not know if I would call it a  Florida zucchini cake, a Kentucky Bourbon cake, or a Georgia Pecan cake. Whatever you decide to name it I have to say it is worth baking and I hope you will try it.

Here is the recipe for my three state bundt cake.

3/4 cup softened butter                                                              
2 cups white sugar                                                                     
3 eggs                                                                                         
2 cups grated zucchini                                                                
1/3 cup Kentucky bourbon
1 cup chopped pecans
1/2 cup unsweetened cocoa powder
2 1/2 cups all purpose flour
 1 1/2 tsp baking powder
 1 1/2 tsp baking soda'
1 1/2 tsp salt
 3/4 tsp ground cinnamon


1. Preheat oven to 350 degrees and grease and flour Bundt pan

2. Cream together sugar and softened butter until light and fluffy.  Add eggs one at a time. Stir in the grated zucchini and the Kentucky Bourbon

3. In another bowl combine the flour, cocoa powder, baking powder, baking soda, salt, cinnamon, and pecans.  Stir this into the sugar, butter and egg mixture until well combined.

4. Pour in Bundt pan and bake for 55 to 60 minutes or until a toothpick comes out clean.  Cool cake and then invert in onto a cake plate.  Drizzle with bourbon glaze or a plain glaze.  Bourbon glaze is made by combing confectioners sugar with bourbon.  Or make a plain glaze made with milk and confectioners sugar if kids will be eating this cake.  No bourbon for the kids please. 


Monday, April 28, 2014

Peter Piper Picked a Pepper--Not yet but Soon

While the squash, zucchini, and potatoes are producing like crazy it is exciting to see the peppers are really growing too.  All the pepper plants were planted in our vertical hydroponic system on March 11, so they have been growing for seven weeks in the hydroponic system.  Here is the Cubanelle Pepper.


This is our first year growing cubanelle peppers.  They are sweet like a bell pepper but with a slight heat.  I am looking forward to my first stuffed pepper.  Looks like a few more days and they will be the perfect size.
 
The California Wonder only has one large pepper but I am sure it will be a good producer this year.  The pepper is getting to be a good size and I have it tagged it for my Ratatouille I plan to cook later in the week.  I am waiting for the eggplant to get a bit larger before I use it in my ratatouille dish. Here is my recipe for this dish
 
1 large yellow squash cubed or sliced
1 med size zucchini cubed or sliced
1 large onion chopped
1 large bell pepper chopped
1 eggplant cubed
1 cup chopped fresh tomatoes or 1 can tomatoes
2 tablespoons olive oil
salt and pepper to taste
 
Saute onions and peppers until soft then add the remaining ingredients and cooked until all the vegetables are soft.
 
A simple dish but loaded with flavor that even the kids love.

 
The Jalapeno bush is loaded.  We have been out of salsa for several months.  I am looking forward to making salsa with these jalapeno, our fresh tomatoes, and the onions from our garden.  I follow the directions for making salsa at www.pickyourown.org

 
This is a tiny little Cayenne pepper but there are many blooms on the bush.  I am going to try my hand at a Tabasco type hot sauce this year. 
 
So while Peter Piper may not have picked a pepper here at my little farmhouse it won't be long before we will be picking a peck of peppers. 

Wednesday, April 23, 2014

Wednesday Harvest

Look what I came home from work to find ready and waiting for me.  Eighteen pounds of new potatoes, five and half pounds of yellow squash and eight pounds of zucchini. 


The potatoes are the perfect size for french fries so that is what I am working on again today.  There are a few small potatoes which are perfect for boiling.  I will save these for dinner during the week.


 Yellow squash cooked with onions will go perfect with the boiling potatoes.  I just slice the squash and sauté them in olive oil with chopped onions until they are tender.  There are many ways to use yellow squash but by far this is my favorite.

 I decided to make zucchini chips from one of the large zucchini. The zucchini chips are made by slicing them very thin and dehydrating them.  I picked dill weed from the garden and layered it on top of the zucchini.  This gives the chips a dill flavor that the kids like.  It takes very little salt and it is very easy to over salt the chips. I only sprinkled a large pinch of salt to each tray of chips. Hopefully this will be enough and not too much salt.

I set the dehydrator to 135 degrees and check the chips after about three hours to see if they are getting crisp.  Once the chips are dehydrated I will store them in an air tight container. Of course the kids will have the chips ate as quick as they come out of the dehydrator.  This is a great snack for kids and one they really love and a lot better for them than the batch of cookies I made for them earlier. 

Another great day at the farmhouse.  Hope you had a good day too.


The Perfect Bloody Mary