Saturday, June 14, 2014

Southern Style Pepper Sauce

If you live in the south or grew up in the south then you are familiar with Pepper Sauce. It's not a hot sauce such as Tabasco sauce where the peppers are fermented then made into a sauce. This pepper sauce is simple and delicious and has many uses. Simple as in collecting peppers, putting peppers in a bottle, pour in white vinegar, and put on a cork. Well that sounds like just infused vinegar and basically yes that is what it is, but if you are a southerner then it is just plain ole peppa sauce. 

What the heck do you do with this you ask?   Well in the south we put it on collard greens, mustard greens, turnip greens, (you get the point - add it to greens). Pour a little pepper sauce on cooked greens or add to greens while they cook.  Pour a little sauce  on black eye peas and it takes them to new level of goodness.  Pepper Sauce can be used in any recipe that calls for vinegar as part of the seasoning.  Pepper Sauce can be added to olive oil to make a  salad dressing,  add to ketchup to make a spicy sauce, and I have even added a splash to a Bloody Mary. Really the sky is the limit on uses for this stuff.

When I was a child every house had a bottle of this special brew sitting in the middle of the dining room table.  A bottle of pepper sauce on the table was as essential as a salt and pepper shaker.

 Just as you fill your salt and pepper shakers you can also add more vinegar to the peppers in the bottle.  Over time the peppers will loose their flavor or rather the heat but the bottle of pepper sauce will be good for a year or so before that happens.

Here's how I make my pepper sauce.

1.  Gather peppers from garden (or no garden just buy at grocery store)  I like a mixture of red and green but sometimes green is all I have .  I also like to use cayenne peppers but any hot pepper will do.


2. Wash peppers and trim stem end.  I do not remove the cap but I do cut the stem off at the beginning of the cap.  I have seen pepper sauce made with the stems on but I prefer to cut these off.


3. Sterilize your bottle of choice.  This year I am using a wine bottle but last year I used a very old Gin bottle.  Just put bottle in boiling water to sterilize. Drain bottle and let cool.

4. Pack peppers into the bottle.  Tap the bottle as you pack to settle the peppers in the bottle. I usually pack peppers up to the beginning of the neck of the bottle.


5. With a funnel pour in white vinegar or your vinegar of choice until it covers the peppers.

6. Cork and decorate or just let the beauty of the peppers be the decoration


7. Give your sauce time to infuse the pepper flavor-  usually a few days will do.


This bottle of pepper sauce is over a year old. As you can see the vinegar is almost gone but the peppers still look good.  Since I am making a new batch of pepper sauce I am not filling this and I will discard the peppers when all the vinegar has been used. 


The pepper sauce is beautiful in the bottle and with a ribbon and nice cork it will work beautifully as a gift. 

No matter where you live this pepper sauce is worth a try.   Give your food a little extra spice or make some great sauces with it. 


.  Here is where this blog has been featured
Mama Kautz

Monday, June 9, 2014

Clean and Can Fresh Pineapple

How excited I was to find pineapple for $.99 each at the grocery store, so I brought home five.  The fresh pineapple were beautiful , the color was perfect and the tops still had a lot of green in them. One was eaten as soon as it was brought into the kitchen,-- we had to do a taste test

Pineapple corers are expensive and I feel I loose too much of the fresh fruit.  The corer slices deep into the pineapple so that the eyes are cut at the same time.  Cleaning the pineapple by hand leaves more of the pineapple and turns the whole pineapple into a beautiful shape. The cleaned pineapple could be used on a fruit platter as the center piece.


Fist cut the leafy top and the bottom off of the pineapple, next thinly slice off the brown husk or bark , and finally the little eyes.  To remove the eyes or little brown hairy parts use a paring knife and cut each eye out.  As you cut out the eyes you will notice a spiral pattern occurring. This way of cleaning leaves more of the pineapple fruit.  After cleaning the pineapple slice the fruit into quarters and then slice out the inner core from each section.  Do not throw out the core because this will be used in making the syrup for canning the pineapple.

Prepare the canning jars by washing and placing the jars in the canner filled with water and let water boil to sterilize jars or sterilize jars by using the dish washer.  Next prepare the syrup to pour over the pineapple. Cut the core pieces into one inch pieces and place in a stock pot or large boiler with two quarts of water and two and half cups of white cane sugar.  This will make a light syrup. Amounts can be adjusted according to the amount of pineapple to can. Four pineapples will make approximately 8 pints of canned pineapple chunks.

Cut the pineapple into chunks and fill sterilized jars with chunks and add hot syrup leaving one inch air space.  Remove any air bubbles using a butter knife or any utensil that is flat like a butter knife. Run the knife around the inside of the jar to remove the bubbles. Place the seal and rim on the jar and place in the hot water canner.

Place the pineapple in the water bath canner and process for 15 minutes for pints. After the 15 minutes place the jars on the counter to cool.  Listen for the pop as each lid seals.  Store the canned pineapple in a cool dark spot such as a cabinet. 

Notice I remove the jar rings from my canned jars.  First the rings seem to rust if any moisture gets in between the ring and the jar.  Second if the jar seal is broken then I know the minute I pick up the jar and I discard the contents immediately. 

During the summer pineapple prices are normally lower than any other time of the year.  It is a great time to stock up and can as much as possible. 


This post was featured on the following


Mama Kautz

Monday, June 2, 2014

Making Hot Sauce

Finally I have red peppers in my garden and I am making hot sauce. Today I gathered 1 oz Casabella peppers, 3 oz. Cayene peppers, 6 oz Jalapeno peppers, one 6 oz Cubanelle pepper, and one 2 oz. Anaheim pepper for a total of one pound of fresh peppers. 


After I picked and washed my peppers I cut off the stem, cut the larger peppers into smaller pieces and put them in my food processor


 After the peppers were processed I stood back making sure my nose was not close to the peppers.  It only takes once to learn small lessons in life. The peppers will take your breath away if you inhale the fumes.  It is best to wait a few minutes after processing and then open the lid. 

After carefully opening the processor I poured the pepper mash into a wide mouth mason jar.  To the jar of peppers I added the brine.  The brine consists of one tablespoon of pickling salt to two cups of room temperature water.  Mix the salt in the water and pour over peppers just enough to cover the peppers.  It is important to use pickling salt because the salt does not contain iodine and mixes easily with the water. Now the mixture has to sit for several weeks until it goes through the fermentation process.  A coffee filter and a rubber band covering the jars helps keep unwanted stuff out but still lets air in.  Air is important for the fermentation of the peppers.

Now begins the hardest part of making hot sauce--waiting for the sauce to ferment.  Each batch of sauce has a different flavor and a different level of heat so you do not know what you get until its ready. 

After a few weeks I will put the mash through the vegetable seive and bottle the sauce.  So please check back with me in a couple of weeks for an update.


I am pleased this post was featured on God's Growing Garden
http://www.godsgrowinggarden.com/p/great-blog-train.html" God’s Growing Garden

Monday, May 26, 2014

Old Fashion Dill Pickles

Cucumbers are growing in our garden and it is time to make some pickles.  This year I am making pickles the old fashion way, using a brine and no vinegar.


First I collected my fresh cucumbers, dill, and grape leaves from our garden.
 
Then I mixed one gallon of warm water with 3/8 cup of pickling salt.  It is important to use pickling salt for two reasons.  First and most important it does not contain iodine, and second the salt is very fine and mixes well with the warm water.

Next I washed my jars and gathered the rest of my supplies and ingredients.

Here is a list of ingredients and supplies you will need

Fresh Cucumbers
Fresh dill
Fresh grape leaves
Gallon of water mixed with 3/8 cup pickling salt (this is the brine)
For a gallon jar I used the following:
        4 cloves of garlic -peeled and smashed
        1 tablespoon of whole peppercorns
        3 bay leaves
        2 tablespoons of dried dill weed

Large glass jar (wide mouth jars work best)
1 Ziploc bag quart size
a container big enough for the jar to sit in

In the bottom of my glass jar I put in grape leaves, the garlic cloves, peppercorns, bay leaves, and the dried dill weed.

Next I placed the fresh dill and cucumbers in the jar.  Making sure the water was cool I added the brine to the jar until it covered the cucumber.  Next I set the jar in a bowl and placed a Ziploc bag filled with the brine water on top to hold down the cucumbers.  Fill the Ziploc bag with the brine in case the bag leaks.

As the cucumbers ferment the brine will over flow from the jar so it is important to put the jar in a container to catch the overflow.


Fermentation will take several days to begin.  The brine will start to bubble and this will be the sign that fermentation has started. After a week of fermination you can start tasting the pickles and when they have the perfect taste for you then place the lid on the jar and place in the fridge.  Pickles will last six months or longer in the fridge.  Of course I do no think they will last that long at my house.  We all love dill pickles.

Friday, May 16, 2014

Eggs


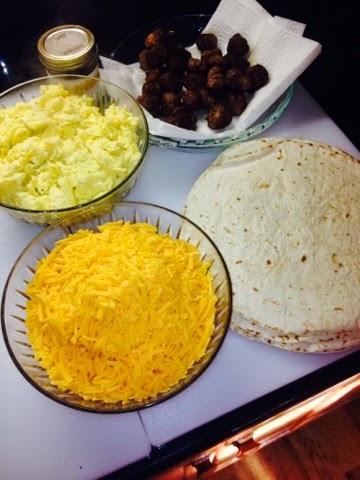
I have two reasons for making my breakfast burritos and freezing them.  Right now the chickens are laying  eggs like crazy and it seems the trays of eggs are taking over my fridge.  This comes at a good time because in several weeks the kiddos will be out of school for the summer and they eat egg burritos for breakfast and lunch. All they have to do is take a burrito out of the freezer and pop into the microwave. 
 
First I prepare all my ingredients for the burritos. I  scramble the eggs, cook the sausage and grate the cheese. 
 
 
  Next I add the ingredients to the tortilla and wrap the filled tortilla in plastic wrap and place in the freezer.  After the kids take the burrito out of the freezer and microwave they can add salsa and top with extra cheese.  
 
This is a great way to use up all those extra chicken eggs and save time in the mornings too. 
 

Tuesday, May 13, 2014

Tator Diggin Day

Today we dug our last four rows of potatoes.  This year has been a great year for potatoes and I have cooked many in the last few weeks,  We have had mashed potatoes, potato salad, fried potatoes, home fries, and baked potatoes.  There is nothing tastier than a fresh dug potato.  To preserve some of this flavor and bounty I am canning what we dig today.  This is what we have learned from my mom and sister on canning potatoes

First thing is to use the sprayer attached to the water hose to remove the skins.  After R dug all of the potatoes he used the pressure washer to peel them. 

 
Since the skins are very tender when they are first removed from the dirt the skins come off very easily.  As soon as the potatoes are peeled we put them in a pan of water with a small amount of lemon juice to prevent the potatoes from turning brown while we are working.


Next we cut the potatoes into cubes and packed them in a sterilized quart jar with a teaspoon of canning salt and hot water.  After leaving one inch of air space at the top of the jar, making sure there were no air pockets in the jar, and placing the seal and ring on each jar, we placed them in the pressure canner.  In the canner we had put about 3 inches of hot water.

 
Once the pressure started to build and the steam was coming out of the vent we waited for ten minutes before putting the weight on the canner to build the pressure.  Then we let the pressure build to ten pounds (the pressure recommended for our area)  and set the timer for 40 minutes.  It is very important that the pressure stays at ten pounds for the entire 40 minutes.
 
After the time was up and the pressure had returned to zero we opened the canner and removed the jars.  The jars need to sit overnight and cool before storing the potatoes. 


Today we canned 35 quarts of potatoes.  With these canned potatoes we can make potato salad, boiled potatoes with butter, mashed potatoes, they can be sauteed with onions and peppers, and used in soups and stews.  Not only are canned potatoes convenient but they are delicious too.

Monday, May 5, 2014

Garden Fresh Spaghetti Sauce

With 23 pounds of tomatoes, several large sweet peppers, and onions from our garden I decided to make and can homemade spaghetti sauce. 


The top and middle tray of tomatoes are early girl, plum, and grape tomatoes.  The large bottom pan is filled with black krim tomatoes. Peppers are cubanelle peppers and California wonder bell peppers. Both peppers are sweet and have a great mild pepper flavor.
Here is how I made my sauce
After I washed and took the stems out of the tomatoes I put them in my food processor
Next I put the tomato juice in the food press to remove any skin and seeds
I put the peppers (stemmed and seeded) in the food processor with the onions and chopped
In a very large stock pot I added the tomato juice, chopped onions and peppers
Then I added the following
(3) 6 oz cans tomato paste
2 tablespoons each of the following dried herbs and spices
basil
parsley
garlic powder
crushed red pepper flakes
oregano
2 single bay leaves
 
Next I added
1 cup olive oil
1/4 salt
1 cup sugar ( less sugar if you like a tangy sauce or more if you like a sweeter sauce) The sugar is really determined by the type of tomatoes used. Black Krim tomatoes are very acidic and tangy tasty where as the early girls have a milder taste.
 
After the mixture came to a boil I reduced the heat to a simmer and cooked for about 4 hours. The amount of time the sauce cooks is determined by how thick you want the sauce to be. I like my sauce to be a medium to thick sauce. 
 
After saucing my tomatoes, chopping my peppers and onions, adding spices, and letting the sauce simmer for a while I decided to make spaghetti for lunch.  This was the taste test to see if the sauce needed more seasoning. I made a simple Bolognese Sauce just by adding browned ground beef to the sauce.
 
Once the sauce passed the taste test and it simmered for 4 hours it was time to can the sauce.  In sterilized quart jars I added the sauce and put the jars in a water bath for 40 minutes. 


Now on a busy night, dinner will be as simple as cooking noodles and opening a jar.  With the addition of a fresh salad and some bread I will have a great home cooked meal in just minutes. Love that!!! 

The Perfect Bloody Mary